ADU
Jump to navigation
Jump to search
Historic Evaluation 121 Myrtle
-
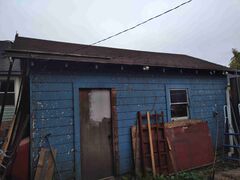
Original garage (1940s)

Demolition Notes-
- When removing shiplap, I used a heavy rubber mallet and a 4x4 to knock outward on small sections of shiplap, working my way up and down the walls next to the studs.
- When removing sheetrock I used a copper plumbing pipe and a rubber mallet to cut holes around the nails in the sheetrock then easily removing the full sheet without creating a mess.
- When cutting the existing slab, I cut into 1'x2' section using a walk behind cement saw with a hose attached for wetting. I didn't how to slowly lower the spinning blade into the cement using an adjustment on the cement saw until I was almost done.
Foundation Notes-
- Use aluminum stakes when marking out foundation perimeter.
- When digging use the "step back" method, work your short handled curved shovel as far as it will go, lift and dump, then step back a few inches for the next shovelful. Do not try to take too big of a load at once, keep them small enough to lift easily.
- Rebar chairs allow bending up towards center, making rebar too close to surface at center of slab. Remedy: support downward facing rebar and leave more space at top.
- Use twisting tool for tying rebar.
- Rent bender (weekly rate) and cutter for rebar.
- Used soil cement to create sharp edges on upper interior trench.
- Covered 100 % with 15mil underlayment requires UFER to be placed outside of trench or separate driven rods.
- Make sure anchor bolts are placed properly during pour. They will need to be adjusted as pouring will move them.
- Problem: When setting anchor bolts for HDU they were set too low. The HDUs requires bolts to be projected about 4.5 inches. Width of sole plate plus another 1.5 inches for HDU mechanism and at least. 5 inches for bolt. Fix: Cut anchor bolt to lower level to allow coupler to attach extra rod to match needed height.
Framing Notes:
- Make sure walls are plumb before adding sheathing.
- Cuts at 3.56 degrees for upper walls.
- Use wall jacks to lift walls.
- When installing floor and roof diaphragms, cut ends of sheathing for exact match on 2x10s, hold in place temporarily with screws before nailing.
- Fill floor and roof diaphragms with liquid flash immediately after nailing, this will protect in case of rain.
- Use 6" heavy rafter screws through header at a 45 for each rafter and 6" timber screws through header straight up into blocking.
- I used 6" screws up through header into blocking.
- Make sure upper ends of rafter joists are perfectly aligned before screwing in place. The bottom ends can be cut to match sheathing. Also use only screws until everything has been completely set in place. This allows for easy removal of a joist if needed due to unseen warp or twisting.
- Cut rafter ends so fascia matches with sheathing. Cut small piece of plywood to use as small straight edge screwed in to the rafter tail. Cut plywood at 3.56 to allow 90 degree rafter tails. Place sheathing at edge but far enough away to allow room for circular saw downward cut. Clamp a 2x4 at edge of sheathing for safety while leaning over and cutting with circular saw, alternatively using a ladder from inside of second level and reaching out with circular saw might be safer and easier. Another approach is to pull back the sheathing from 1 to 2 feet lie flat on the roof top, screw a 2x4 along the bottom edge of the sheathing and then reach out and down to access the roof edge.
- Install 2x10 fascia using heavy duty brackets screwed into bottom of rafter ends. They should leave room for a 2x10 to drop into place easily. Place the 2x10 at the edge of the roof and slowly from the center lift the 2x10 on end until it drops into both brackets simultaneously.
- There is no requirement that shear wall panel edge blocking match the depth of the wall studs, nor is there a requirement that it be oriented in the same axis as the wall studs. Shear wall blocking can be narrower than the adjacent studs (i.e. 2×4 blocking in a 2×6 wall) or rotated 90 degrees (oriented with the wide face of the blocking attached to the sheathing panel edges), provided the following conditions are met:
- The blocking is 2x nominal or greater as required in the American Wood Council’s Special Design Provisions for Wind and Seismic (SDPWS) section 4.3.6.1.
- The minimum nail penetration of the panel edge fasteners into the blocking (per SDPWS Table 4.3A) is still obtained.
- A35's or LPT4 (when header matches blocking) must be used at 16" on all blocking sections.
- HDU's I placed holdown on stud with one screw to get accurate drilling placement before drilling then removed screw for drilling. It was very difficult to get drilling alignment just right when drilling from second to first floor. I also used predrilled lag bolts (13/32 bit required for pilot hole, but I used 12/32?) into large beams.
Sheathing Notes
- We lifted upper sheets into place with wench and set on top of two temporary screws, then locked it in place with a couple of screws into studs. Mostly did nailing later.
- I doubled up studs when needed at edges of two exterior pieces of plywood.
- inspector said when nailing is 4" or less on edges this requires a structural engineer to inspect.
Roofing Notes
- I cleaned up roofing of all "shiners" and replaced with screws.
- Swept roof well before laying 36" self-adhesive underlayment.
