How to Build a Tiny Home Step by Step
-
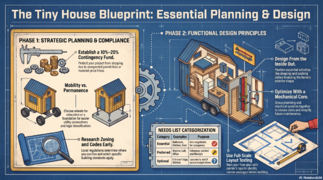 Planning and Design
 -
 The Interior Layout
 -
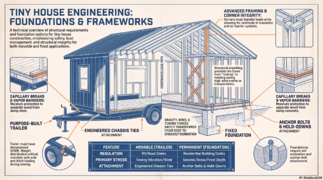 Structural Phase
 -
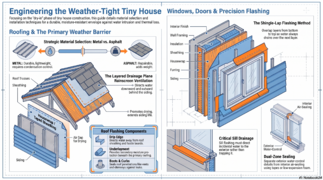 Windows and Exterior Defenses
 -
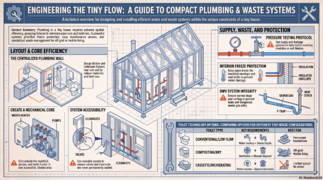 Plumbing
 -
 Mechanical Systems
 -
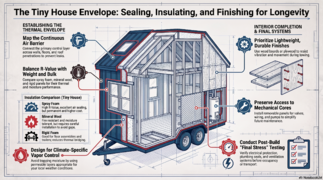 Thermal Envelope


How to Build a Tiny House: A Step-by-Step Guide
Building a tiny house is not simply a matter of constructing a smaller conventional home. Every square foot, structural connection, utility route, storage area, and mechanical system must work together efficiently.
The safest way to build a tiny house is to plan the entire project before construction begins. Determine how the house will be legally classified, where it will be located, how it will be supported, how utilities will operate, and who will live in it.
This guide follows the general order in which a tiny-house project should be planned and built.
Step 1: Decide How the Tiny House Will Be Used
Before drawing plans or buying materials, decide exactly what the tiny house will be.
It may be:
- A permanent residence
- An accessory dwelling unit
- A guesthouse
- A vacation cabin
- A rental
- A movable tiny house
- An off-grid home
- A temporary dwelling
The intended use affects zoning, permits, utilities, design, insurance, construction standards, and where the house can legally be occupied.
Write down who will live in the house.
Consider:
- Number of occupants
- Children
- Older adults
- Mobility limitations
- Pets
- Work-from-home requirements
- Sleeping arrangements
- Cooking habits
- Storage needs
- Laundry requirements
- Future changes
Design the house for the people who will actually use it.
Do not begin by asking, "How small can I make the house?"
Begin by asking, "What does this house need to do?"
Step 2: Create an Essential-Needs List
Divide the features you want into three categories.
Essential
These are features the house must have.
Examples include:
- Sleeping space
- Toilet
- Shower
- Kitchen
- Food storage
- Clothing storage
- Heating
- Ventilation
- Electrical service
- Water
- Waste disposal
Preferred
These are important but negotiable.
Examples include:
- Washer and dryer
- Full-size refrigerator
- Office
- Dining table
- Bathtub
- Sleeping loft
- Dishwasher
Optional
These are features you would enjoy but could eliminate if the house becomes too expensive, heavy, or crowded.
Keeping these three lists separate makes design decisions easier.
Step 3: Decide Between a Foundation and a Trailer
One of the most important decisions is whether the tiny house will be permanently installed or constructed on a trailer.
Foundation-Built Tiny House
A foundation-built house may use:
- Concrete slab
- Crawlspace
- Stem-wall foundation
- Piers
- Helical piles
- Basement
A permanent foundation generally makes utility connections and legal dwelling classification easier.
The foundation must be appropriate for:
- Soil conditions
- Building loads
- Frost depth
- Seismic forces
- Wind
- Snow
- Flood risk
Tiny House on Wheels
A movable tiny house is constructed on a trailer chassis.
Trailer construction introduces additional requirements involving:
- Weight
- Axle capacity
- Hitch loading
- Road height
- Road width
- Overall length
- Brakes
- Tires
- Towing forces
- Vibration
- Trailer-to-house attachment
Do not assume a trailer allows you to ignore zoning or occupancy regulations.
A movable structure may be classified differently from a permanent dwelling.
Determine the legal classification before construction.
Step 4: Check Zoning Before Spending Money
Contact the local planning department.
Explain:
- The size of the proposed house
- Whether it will be movable
- Whether someone will live in it permanently
- The proposed property
- Whether it is an accessory dwelling
- How water and sewage will be handled
Ask about:
- Minimum dwelling size
- Accessory dwelling units
- Setbacks
- Maximum building height
- Parking
- Owner-occupancy rules
- Recreational vehicle restrictions
- Density
- Utility requirements
Also investigate:
- Deed restrictions
- Easements
- Homeowners' association rules
- Private covenants
- Utility rights-of-way
Obtain important approvals or interpretations in writing whenever possible.
Do this before ordering a trailer or purchasing large quantities of materials.
Step 5: Determine the Required Permits
Depending on the project, permits may include:
- Planning approval
- Building permit
- Electrical permit
- Plumbing permit
- Mechanical permit
- Grading permit
- Septic approval
- Driveway permit
- Utility permits
Ask which inspections are required.
Typical inspection stages may include:
- Foundation
- Under-slab utilities
- Framing
- Rough plumbing
- Rough electrical
- Mechanical systems
- Insulation
- Drywall or fire protection
- Final inspection
Create an inspection schedule.
Do not cover work that must be inspected.
Step 6: Build a Realistic Budget
Create a spreadsheet or written budget.
Include:
- Land or site costs
- Plans
- Engineering
- Permits
- Trailer or foundation
- Excavation
- Concrete
- Lumber
- Sheathing
- Fasteners
- Structural connectors
- Windows
- Doors
- Roofing
- Siding
- Insulation
- Plumbing
- Electrical equipment
- Heating and cooling
- Ventilation
- Cabinets
- Appliances
- Flooring
- Interior finishes
- Tools
- Equipment rental
- Transportation
- Inspections
- Cleanup
Add a contingency fund.
Unexpected expenses may include:
- Damaged materials
- Delivery fees
- Permit revisions
- Engineering changes
- Utility upgrades
- Additional tools
- Weather damage
A contingency of approximately 10 to 20 percent provides protection against unexpected costs.
Step 7: Evaluate the Building Site
Walk the property carefully.
Look at:
- Drainage
- Soil
- Slope
- Trees
- Sunlight
- Wind
- Flooding
- Wildfire exposure
- Snow
- Vehicle access
- Emergency access
Determine where water flows during storms.
Water should move away from the house.
Check whether the site has:
- Electricity
- Potable water
- Sewer
- Septic capacity
- Propane access
- Internet
- Suitable roads
Utility extensions can be extremely expensive.
Locate existing underground utilities before excavation.
Step 8: Create the Floor Plan From the Inside Out
Do not begin by drawing the exterior walls.
Begin with the activities that will occur inside.
Place:
- Bed
- Toilet
- Shower
- Kitchen sink
- Cooking equipment
- Refrigerator
- Seating
- Table
- Desk
- Storage
- Stairs
Then design the structure around these needs.
Use painter's tape to mark the floor plan at full scale.
Use cardboard boxes to represent:
- Cabinets
- Appliances
- Counters
- Furniture
Walk through normal activities.
Pretend to:
- Cook dinner
- Open the refrigerator
- Enter the bathroom
- Get dressed
- Carry groceries
- Make the bed
Check for door conflicts and narrow passages.
Full-scale testing can reveal problems that are difficult to see on a drawing.
Step 9: Keep the Building Shape Simple
A rectangular house is generally easier to build.
Complex features increase labor and create additional opportunities for leaks.
Limit unnecessary:
- Bump-outs
- Intersecting roofs
- Complicated corners
- Dormers
A simple building form is easier to:
- Frame
- Insulate
- Air seal
- Flash
- Roof
- Finish
Step 10: Plan Windows Carefully
Windows provide:
- Daylight
- Views
- Ventilation
- Emergency escape
However, windows also remove wall space.
Too many windows can make it difficult to install:
- Cabinets
- Shelves
- Furniture
- Structural bracing
Draw every interior wall before finalizing the window plan.
Plan operable windows on opposite or adjacent walls when practical.
This can improve cross-ventilation.
Higher windows can help warm air escape.
Lower openings can admit cooler air.
Step 11: Decide Whether to Build a Sleeping Loft
A sleeping loft can preserve floor space.
However, consider:
- Headroom
- Stair access
- Nighttime use
- Ventilation
- Emergency escape
- Guardrails
- Mattress installation
Think about the future.
Climbing into a loft may become difficult as occupants age.
A ground-floor bed may provide greater long-term accessibility.
Options include:
- Permanent bed
- Murphy bed
- Sofa bed
- Bed under a platform
- Small ground-floor bedroom
Step 12: Design Safe Loft Access
Stairs should have:
- Consistent treads
- Secure handholds
- Adequate headroom
- Safe landings
Storage may be incorporated beneath stairs.
Do not weaken required structural members while creating drawers or cabinets.
Ladders require less space but can be difficult for:
- Children
- Older adults
- People with disabilities
- Pets
Secure ladders firmly.
Install required guards around open loft edges.
Confirm emergency escape requirements before ordering loft windows.
Step 13: Plan Storage Before Framing
Make a list of everything that must be stored.
Include:
- Clothes
- Shoes
- Food
- Cookware
- Cleaning supplies
- Linens
- Tools
- Documents
- Outdoor equipment
- Trash
- Recycling
Assign a location to each category.
Use vertical storage where appropriate.
Possible storage locations include:
- Above doors
- Beneath stairs
- Beneath benches
- Tall cabinets
- Wall shelves
Do not fill every wall with cabinets.
A tiny house also needs visual breathing room.
Step 14: Create a Mechanical Core
Group utilities together when practical.
Place the kitchen and bathroom near the same plumbing wall.
A mechanical area may contain:
- Water heater
- Plumbing manifold
- Filters
- Water pump
- Electrical panel
- Inverter
- Ventilation equipment
Short utility runs reduce:
- Material use
- Heat loss
- Plumbing connections
- Installation complexity
Provide access panels.
Never permanently seal valves, filters, pumps, or important electrical connections behind finishes.
Step 15: Prepare Construction Plans
Construction plans should identify:
- Dimensions
- Foundation
- Floor framing
- Wall framing
- Roof framing
- Beams
- Headers
- Structural connectors
- Sheathing
- Fasteners
- Windows
- Doors
- Plumbing
- Electrical systems
- Mechanical systems
Structural engineering may be necessary for:
- Trailer attachments
- Large window openings
- Lofts
- High wind areas
- Snow loads
- Seismic areas
- Unusual roofs
- Long structural spans
Do not change engineered structural components without approval.
Step 16: Prepare the Trailer
For a tiny house on wheels, use a trailer with documented capacity.
A purpose-built tiny-house trailer may include:
- Structural attachment points
- Appropriate crossmembers
- Wheel wells
- Brakes
- Lighting
- Documented ratings
Inspect:
- Welds
- Frame
- Coupler
- Axles
- Tires
- Brakes
- Bearings
- Wiring
Repair corrosion or damaged coatings.
Level the trailer on firm supports.
The trailer must not move while the house is framed.
Maintain access to:
- Bearings
- Brakes
- Tire valves
- Wiring junctions
- Identification plates
Step 17: Create a Weight Budget
Tiny houses on wheels must be designed by weight.
Estimate the weight of:
- Trailer
- Floor
- Lumber
- Sheathing
- Roofing
- Siding
- Windows
- Insulation
- Wall finishes
- Cabinets
- Appliances
- Water tanks
- Batteries
- Furniture
- Personal belongings
Remember that water is heavy.
Include stored water in the weight calculation.
Update the estimate as materials are selected.
Heavy components must be positioned to maintain safe axle and hitch loading.
When construction is complete, weigh the house on certified scales.
Step 18: Verify Transportation Dimensions
Confirm legal limits for:
- Width
- Height
- Length
- Axle loading
- Combination length
Remember to include:
- Roof equipment
- Vents
- Solar equipment
- Exterior trim
Oversized structures may require:
- Permits
- Escort vehicles
- Route planning
- Professional transportation
Step 19: Build the Foundation
For a permanent house, lay out the structure accurately.
Establish:
- Property lines
- Setbacks
- Building corners
- Finished-floor elevation
- Utility locations
Measure diagonals to verify the foundation is square.
Excavate safely.
Build footings according to approved plans.
Install reinforcing steel with the required:
- Spacing
- Overlap
- Supports
- Concrete coverage
Install:
- Anchor bolts
- Hold-downs
- Structural straps
Position these components carefully before concrete is poured.
Step 20: Control Ground Moisture
Install a vapor barrier beneath slabs or across crawlspace floors when required.
Seal:
- Seams
- Penetrations
- Edges
Use a capillary break between concrete or masonry and wood framing.
This can help prevent moisture movement into the wood structure.
Plan foundation insulation according to:
- Climate
- Foundation type
- Termite conditions
Step 21: Install Under-Slab Utilities
Before pouring a slab, install required:
- Drain pipes
- Water sleeves
- Electrical conduit
- Grounding components
Inspect these systems before concrete placement.
Take photographs.
Record pipe and conduit locations.
Once concrete is poured, these systems may be difficult to locate or repair.
Step 22: Build the Floor System
Construct the floor according to the structural plans.
Install:
- Perimeter framing
- Joists
- Blocking
- Structural connections
Confirm the platform is square.
Check diagonal measurements.
For trailer houses, protect the underside from:
- Water
- Road debris
- Pests
- Air movement
Seal penetrations.
Install floor insulation without large gaps.
Carefully insulate around:
- Steel members
- Pipes
- Anchors
- Wheel wells
Protect the insulation.
Step 23: Install the Subfloor
Use the specified structural panels.
Apply compatible construction adhesive when required.
Fasten panels according to the structural fastening schedule.
Stagger panel joints.
Maintain required expansion gaps.
Check the floor for:
- Flatness
- Squareness
- Loose areas
Correct problems before wall framing begins.
Step 24: Lay Out the Walls
Mark the wall plates.
Identify:
- Stud locations
- Corners
- Window openings
- Door openings
- Interior partitions
- Plumbing walls
- Hold-downs
Check actual window and door specifications before framing openings.
Do not rely solely on approximate advertised sizes.
Step 25: Frame the Exterior Walls
Use framing lumber of the specified grade and species.
Select straight, dry lumber.
Avoid severely:
- Twisted
- Split
- Decayed
- Damaged
Frame:
- Studs
- Headers
- Window sills
- Cripple studs
- Blocking
Use structural connectors where specified.
Build walls on a flat surface when practical.
Step 26: Raise and Brace the Walls
Wall sections can be heavy.
Plan the lift before beginning.
Use enough workers or lifting equipment.
Keep people away from potential fall zones.
Raise each wall and immediately install temporary bracing.
Check each wall for:
- Plumb
- Alignment
- Position
Do not remove temporary braces until the permanent structure is stable.
Step 27: Connect the House to the Trailer or Foundation
The structure requires a continuous load path.
Loads must move through:
- Roof
- Walls
- Floor
- Foundation or trailer
The connections may need to resist:
- Gravity
- Wind
- Uplift
- Seismic forces
- Braking
- Towing vibration
A tiny house on wheels should be attached to the trailer using properly designed structural connections.
Do not assume ordinary residential nails are sufficient for a movable house.
Step 28: Frame the Loft
Install loft joists according to the structural design.
Check:
- Joist size
- Spacing
- Span
- Bearing
Install:
- Blocking
- Structural connectors
- Guard attachment points
Coordinate the loft framing with:
- Stairs
- Ladder
- Electrical wiring
- Lighting
- Ventilation
Step 29: Coordinate Plumbing and Framing
Identify plumbing routes before drilling structural members.
Avoid placing major framing where large drain pipes must pass.
Improper holes and notches can weaken:
- Joists
- Studs
- Beams
Move the plumbing or obtain an approved structural solution when necessary.
Step 30: Coordinate Electrical Routes
Plan routes for:
- Receptacles
- Switches
- Lighting
- Appliances
- Electrical panel
Drill cables through approved framing locations.
Protect wiring from screws and nails using approved protection plates where required.
Step 31: Install Structural Sheathing
Install wall sheathing according to the structural plans.
Follow requirements for:
- Panel orientation
- Fastener spacing
- Edge gaps
- Blocking
Structural sheathing helps the house resist racking and wind forces.
When the sheathing is also part of the air or water barrier, seal joints with compatible products.
Clean surfaces before applying tape.
Roll tapes as directed by the manufacturer.
Step 32: Frame the Roof
Build roof framing according to approved plans.
Verify:
- Roof pitch
- Rafter size
- Rafter spacing
- Truss layout
- Bearing
- Connectors
- Overhangs
Roof overhangs can help protect:
- Walls
- Doors
- Windows
On a movable house, overhangs must also comply with transportation width limitations.
Step 33: Install Roof Sheathing
Install roof panels according to structural requirements.
Maintain:
- Correct panel orientation
- Required gaps
- Fastener spacing
Use clips or blocking when specified.
Protect workers from falls.
Avoid roof work during:
- High winds
- Ice
- Heavy rain
Step 34: Dry In the House
Protect the structure from weather as quickly as practical.
Remove standing water.
Allow wet framing to dry.
Do not install insulation over wet materials.
A dried-in building normally has enough exterior protection to reduce direct weather exposure.
Step 35: Install Roof Underlayment
Apply roof underlayment so each upper layer overlaps the lower layer.
The goal is simple:
Water should always flow downward and outward.
Carefully detail:
- Roof edges
- Valleys
- Ridges
- Penetrations
Step 36: Install the Roofing
Choose roofing based on:
- Weight
- Climate
- Fire exposure
- Roof pitch
- Maintenance
- Transportation
Metal roofing is commonly used on tiny houses because it can be lightweight and durable.
Install roofing according to the manufacturer's requirements.
Do not rely on sealant alone to prevent roof leaks.
Step 37: Flash Roof Penetrations
Plan penetrations carefully.
These may include:
- Plumbing vents
- Exhaust ducts
- Chimneys
- Skylights
- Solar attachments
Use properly designed:
- Boots
- Curbs
- Flashing
- Counterflashing
Exposed sealant should not be the primary long-term waterproofing system.
Step 38: Choose a Roof Ventilation Strategy
Determine whether the roof assembly will be:
- Vented
- Unvented
The correct system depends on:
- Climate
- Insulation
- Roof depth
- Vapor control
Do not accidentally mix incompatible roof systems.
Poor roof design can create hidden condensation and decay.
Step 39: Install Windows
Prepare each window opening.
A general layered flashing sequence includes:
- Prepare the rough opening.
- Install sill flashing.
- Install the window.
- Fasten the window.
- Flash the sides.
- Install head flashing.
Upper flashing layers should overlap lower layers.
Water must drain toward the exterior.
Step 40: Air Seal Windows and Doors
Exterior flashing manages water.
Interior sealing controls air leakage.
Seal around windows and doors with appropriate:
- Tape
- Membranes
- Backer rod
- Sealant
- Low-expansion foam
Use materials compatible with the window and wall system.
Step 41: Install Exterior Doors
Check that the opening is:
- Square
- Level
- Plumb
Install durable sill or pan flashing beneath the threshold.
Adjust the door until it operates smoothly.
Check that weather seals contact evenly.
Step 42: Install the Exterior Drainage Plane
Install a water-resistive barrier.
This may include:
- Housewrap
- Taped sheathing
- Approved membrane
Integrate the drainage plane with:
- Windows
- Doors
- Roof transitions
- Lower-wall flashing
Water should have a continuous path downward and outward.
Step 43: Consider a Rainscreen
A rainscreen creates a small drainage and drying space behind the siding.
Vertical furring may be used when compatible with the siding system.
Protect ventilation openings from insects.
A rainscreen can improve the ability of exterior walls to dry.
Step 44: Install Siding
Choose siding based on:
- Weight
- Moisture resistance
- Fire resistance
- Maintenance
- Durability
Follow required clearances from:
- Soil
- Roofing
- Decks
- Horizontal surfaces
Properly flash the bottom of the walls.
Carefully detail exterior corners.
Step 45: Install Gutters and Drainage
Gutters can protect:
- Siding
- Entrances
- Foundations
- Surrounding soil
Direct downspouts away from the building.
Do not discharge large amounts of roof water directly against the foundation.
Step 46: Build the Water-Supply System
Determine the water source.
Possible sources include:
- Municipal water
- Well
- Storage tank
Plan:
- Main shutoff
- Pipe routes
- Filters
- Fixture shutoffs
- Freeze protection
Keep water lines short and accessible.
Step 47: Install the Drain-Waste-Vent System
The drainage system requires:
- Proper pipe sizes
- Correct slopes
- Approved fittings
- Traps
- Cleanouts
- Venting
Do not guess at drainage design.
Incorrect drain systems can cause:
- Slow fixtures
- Odors
- Leaks
- Sewer-gas entry
Step 48: Choose the Toilet System
Tiny-house toilet choices include:
- Conventional flush
- Low-flow
- Cassette
- Composting
- Incinerating
- Dry toilets
Evaluate:
- Local sanitation rules
- Water availability
- Electricity use
- Maintenance
- Waste handling
A toilet system that works for a weekend cabin may not be appropriate for a full-time residence.
Step 49: Build the Shower
Use a complete waterproofing system.
Do not assume tile or wall panels are waterproof.
Plan:
- Waterproofing
- Drainage
- Plumbing valve access
- Ventilation
Verify that the water heater can provide adequate hot water.
Step 50: Install a Plumbing Manifold
A plumbing manifold can provide individual shutoffs for fixtures.
Label every water line.
Keep the manifold accessible.
This can simplify repairs and leak isolation.
Step 51: Protect Plumbing From Freezing
In cold climates, keep plumbing inside the insulated and air-sealed enclosure whenever possible.
Avoid pipes in exposed exterior cavities.
Protect vulnerable pipes with appropriate:
- Insulation
- Drainage
- Approved heating systems
Seal air leaks around plumbing penetrations.
Step 52: Choose a Water Heater
Water-heating options include:
- Storage tank
- Tankless
- Electric resistance
- Heat-pump water heater
- Propane
- Solar-assisted systems
Consider:
- Available electricity
- Fuel
- Required flow rate
- Incoming water temperature
- Space
- Weight
- Ventilation
Step 53: Install Fresh-Water Storage for Off-Grid Use
An off-grid water system may require:
- Food-safe tank
- Fill connection
- Vent
- Pump
- Filter
- Drain
- Level monitor
Secure the tank structurally.
Remember to include the water weight in the trailer or structural weight calculation.
Step 54: Plan Greywater Disposal
Do not automatically discharge shower or sink water onto the ground.
Greywater regulations vary.
Obtain approval for the proposed system.
Design the system to prevent:
- Odors
- Freezing
- Surface discharge problems
Step 55: Test the Plumbing
Pressure-test water lines.
Test drains.
Check every connection.
Complete testing before covering plumbing with:
- Insulation
- Wall finishes
- Cabinets
Photograph concealed plumbing.
These photographs may be extremely useful during future repairs.
Step 56: Calculate Electrical Loads
Make a complete list of electrical equipment.
Include:
- Lights
- Receptacles
- Refrigerator
- Cooking equipment
- Water heater
- Heating
- Cooling
- Washer
- Pumps
- Ventilation
Use this information to determine the required:
- Electrical service
- Panel
- Conductors
- Inverter
- Batteries
- Generator
Step 57: Install the Electrical Panel
Locate the electrical panel where it is:
- Dry
- Accessible
- Protected
Maintain required working clearances.
Do not bury the electrical panel inside an inaccessible storage cabinet.
Step 58: Plan Receptacle Locations
Install receptacles where electrical devices will actually be used.
Plan around:
- Counters
- Beds
- Seating
- Desks
- Appliances
- Mechanical equipment
- Exterior work areas
Good receptacle planning reduces extension-cord use.
Step 59: Install Electrical Wiring
Use approved:
- Cable
- Conduit
- Boxes
- Connectors
Install required:
- Grounding
- Overcurrent protection
- Physical protection
Kitchens, bathrooms, and exterior locations may require special electrical protection.
Ground-fault and arc-fault protection may be required depending on the applicable electrical code.
Step 60: Install Efficient Lighting
LED fixtures use relatively little electricity.
Use several layers of lighting.
Consider:
- General ceiling lighting
- Counter lighting
- Reading lights
- Stair lights
- Loft lighting
- Exterior lighting
Multiple smaller lights often work better in a tiny house than one extremely bright fixture.
Step 61: Design an Off-Grid Solar System
Begin by calculating daily electrical use.
Do not begin by randomly selecting solar panels.
Account for:
- Daily energy use
- Seasonal sunlight
- Shade
- System losses
- Battery autonomy
- Battery temperature
- Generator backup
- Future expansion
Design the system around realistic energy consumption.
Step 62: Install Batteries Safely
Battery requirements vary by technology.
Provide:
- Secure mounting
- Electrical protection
- Appropriate temperature conditions
- Required ventilation
Follow battery and inverter manufacturer instructions.
Protect battery cables from physical damage and electrical faults.
Step 63: Install Shore Power When Required
Movable tiny houses may use an exterior electrical connection.
Use equipment designed for the voltage and current involved.
The connection may require:
- Weatherproof fittings
- Grounding
- Overcurrent protection
The correct system depends partly on how the tiny house is legally classified.
Step 64: Select Heating and Cooling
Tiny houses have small heating and cooling loads.
Equipment options include:
- Mini-split heat pumps
- Electric heaters
- Hydronic systems
- Wood stoves
- Approved fuel-fired appliances
Size equipment for the actual building.
Oversized equipment may perform poorly.
Step 65: Install Mechanical Ventilation
Tiny houses can accumulate moisture and indoor pollutants rapidly.
An airtight tiny house needs intentional ventilation.
Systems may include:
- Exhaust ventilation
- Supply ventilation
- Heat-recovery ventilation
- Energy-recovery ventilation
Select the system based on:
- Climate
- Occupancy
- Building tightness
Step 66: Vent the Kitchen
Install an exterior-vented range hood when appropriate or required.
The hood can remove:
- Moisture
- Smoke
- Grease
- Cooking pollutants
Keep ductwork:
- Short
- Smooth
- Properly sized
Install an exterior damper.
Step 67: Vent the Bathroom
Install a bathroom fan that exhausts directly outdoors.
Select a quiet fan.
Loud fans are often left turned off.
Seal the exhaust duct.
Insulate the duct where condensation is a concern.
Step 68: Install Smoke and Carbon-Monoxide Alarms
Install approved alarms according to local requirements and manufacturer instructions.
Carbon-monoxide protection is especially important when the house has:
- Combustion appliances
- Wood stove
- Propane equipment
- Nearby generator
- Nearby vehicles
Step 69: Create a Continuous Air Barrier
Identify the main air-control layer.
It must connect across:
- Floor
- Walls
- Roof
- Windows
- Doors
Seal utility penetrations.
A continuous air barrier can improve:
- Comfort
- Energy efficiency
- Moisture management
Step 70: Choose Insulation
Common insulation options include:
- Fiberglass
- Mineral wool
- Cellulose
- Rigid foam
- Spray foam
- Natural fibers
- Structural insulated panels
Evaluate:
- R-value
- Weight
- Fire characteristics
- Moisture tolerance
- Cost
- Installation requirements
Good installation is extremely important.
Gaps can significantly reduce insulation performance.
Step 71: Install Insulation Carefully
Fit insulation around framing and utilities.
Avoid unnecessary compression.
Fill cavities as intended by the insulation system.
Check:
- Corners
- Rim areas
- Roof transitions
- Wheel wells
- Utility penetrations
Do not insulate over wet framing.
Step 72: Plan Vapor Control
Vapor-control requirements depend on:
- Climate
- Wall design
- Roof design
- Insulation type
Avoid creating assemblies that trap moisture between impermeable layers.
Use a building assembly appropriate for the local climate.
Step 73: Inspect Everything Before Closing the Walls
Before installing interior wall finishes, inspect:
- Framing
- Connectors
- Plumbing
- Wiring
- Ventilation
- Insulation
- Air sealing
Take detailed photographs of every wall.
Photograph:
- Pipes
- Wires
- Blocking
- Structural connectors
These records help prevent accidentally drilling into concealed utilities.
Step 74: Install Interior Wall and Ceiling Finishes
Interior finish options include:
- Drywall
- Plywood
- Wood boards
- Approved panels
Consider:
- Weight
- Fire resistance
- Durability
- Repairability
Movable tiny houses may experience vibration and structural movement.
Select finishes and fastening systems accordingly.
Step 75: Install Cabinets
Install cabinets according to the layout.
Secure them to structural framing.
This is especially important in a movable house.
Confirm that cabinets do not block:
- Plumbing valves
- Electrical equipment
- Ventilation systems
- Pumps
- Filters
Use removable access panels where necessary.
Step 76: Install Flooring
Choose flooring that can tolerate concentrated use.
A tiny house may receive substantial foot traffic in a very small area.
Consider:
- Water resistance
- Durability
- Weight
- Repairability
Install flooring according to manufacturer requirements.
Step 77: Install Appliances
Install each appliance with required:
- Clearances
- Electrical connections
- Plumbing
- Ventilation
Secure appliances in a movable tiny house.
Verify that doors and drawers can open fully.
Test each appliance.
Step 78: Install Stairs, Guards, and Handholds
Complete permanent loft access.
Check:
- Stair security
- Handholds
- Guards
- Landings
Eliminate dangerous projections and sharp corners in circulation areas.
Step 79: Complete Exterior Drainage
Recheck the site after construction.
Verify that water flows away from the building.
Complete:
- Grading
- Swales
- Gutters
- Downspouts
- Drains
- Erosion protection
Water management is a major part of building durability.
Step 80: Perform a Complete Systems Test
Test the house before occupancy.
Plumbing
Check:
- Water pressure
- Shutoffs
- Drains
- Toilet
- Shower
- Water heater
Electrical
Test:
- Receptacles
- Lights
- Protective devices
- Appliances
Heating and Cooling
Run the system through normal operating cycles.
Ventilation
Test:
- Bathroom fan
- Kitchen exhaust
- Whole-house ventilation
Doors and Windows
Check:
- Operation
- Locks
- Weather seals
Safety
Test:
- Smoke alarms
- Carbon-monoxide alarms
Step 81: Complete Required Inspections
Schedule final inspections.
Correct identified problems.
Obtain required occupancy approval before moving into a tiny house that requires legal occupancy authorization.
Retain copies of:
- Plans
- Permits
- Inspection records
- Engineering
- Product manuals
- Warranties
Step 82: Weigh a Movable Tiny House
Before towing, weigh the completed tiny house.
Include normal:
- Water
- Batteries
- Propane
- Furniture
- Equipment
Confirm:
- Total weight
- Axle loads
- Hitch loading
Do not tow an overloaded tiny house.
Inspect:
- Tires
- Brakes
- Bearings
- Lights
- Coupler
Professional transportation may be appropriate for a heavy or oversized house.
Step 83: Create a Tiny-House Maintenance File
Keep one file containing:
- Approved plans
- Permits
- Inspection documents
- Photographs
- Wiring locations
- Plumbing locations
- Equipment manuals
- Paint information
- Roofing information
- Appliance model numbers
Create a maintenance schedule.
Regularly inspect:
- Roof
- Flashing
- Sealants
- Siding
- Drainage
- Plumbing
- Ventilation
- Electrical equipment
For a movable house, also inspect:
- Trailer frame
- Rust
- Welds
- Tires
- Bearings
- Brakes
- Structural attachments
Conclusion
The best tiny houses are not simply small buildings. They are carefully coordinated homes.
A successful tiny-house project begins with zoning, legal classification, a realistic budget, and a design based on the occupants' needs.
The structure should be simple, durable, and easy to maintain. Plumbing and mechanical systems should be grouped where practical. Water should always have a clear path away from the building. Air barriers and insulation should be continuous. Utilities should remain accessible for service.
Tiny houses on wheels require special attention to weight, structural attachment, axle loading, road dimensions, and towing forces.
Foundation-built tiny houses require careful site preparation, drainage, foundation design, and utility planning.
Build in a logical order.
Plan first.
Confirm zoning and permits.
Design the entire house.
Construct the support system.
Frame the structure.
Dry in the building.
Install utilities.
Insulate and air seal.
Finish the interior.
Test every system.
Complete inspections.
Document the finished house.
A well-built tiny house should be safe, comfortable, durable, efficient, and designed around the people who will live in it.
